Backup and Restore module
Logging into the Backup and Restore
module and you will see a screen like the one below.
- On the top menu click Admin
- In the drop down click Backup & Restore
You'll see a list of the current
backup jobs you have created, and any that were created by default.

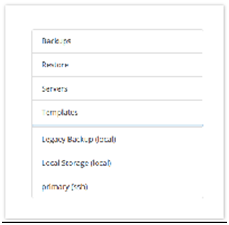
Menu
Item
Click the menu button at the right to expand the
menu.
at the right to expand the
menu.
at the right to expand the
menu.
Backups
The Backups section of the backup
module is where you actually define a backup job. You can create as many
backup jobs as you want and set when and how often they should run, what
should be included in the backup, and where to store it.
Restores
The Restore section of the backup
module is where you restore from a backup. You can restore from a backup
on your local computer or from any defined FTP, SSH or Local storage server.
Servers
The Servers section is where you
define any PBX servers or database tables that you want to backup
configurations from. You also define Linux boxes or FTP servers you want
to store the backups on.
Templates
Templates are used to create groups
of files, directories, or databases that you want to include in a backup. We
have defined some standard templates for you already, but you can add your
own custom templates. When creating a backup job, you can drag one or more
templates into it to define what is going to be backed up.
Backup
Settings
Click the New Backup button
to create a new backup, or click an existing backup to edit its settings.

Backup
Name
Give your backup job a name to
easily identify it.
Description
Here you can optionally define a
longer description or add notes.
Status
Email
If defined, the system will send
status updates to this e-mail address when the backup task is run.
Backup
Items

Items
This is where you choose what will
actually be backed up. On the right side you will see a list of standard
templates that are included with your PBX. The most standard template you
would want to use for a normal daily backup is the Full Backup.
To include the full backup template,
drag it from the Templates bin to the Items bin.
APPLICATION NOTE
Advanced users can also press the
plus sign icon to add your own files or directory
paths to be included in a backup.
Please see templates section on how
to modify or create your own templates.

Once you add an item, you will see
the items that will be backed up, as well as any exclusions:
APPLICATION NOTE
The Full Backup template does not
include any voicemails, custom music on hold, or system prompt recordings. If
you want these to be included, drag the “System Audio” and “Voicemail Templates”
from the Templates bin to the Items bin.
Hooks
Hooks allow you to base the backup
job on the following actions in order to execute a custom script at the
location defined for each action. This is for advanced users who would like to
customize the following actions.
APPLICATION NOTE
Make sure your script has
execute permissions for the Asterisk user.

Pre-Backup
Hook-->Hook to run before starting the
actual backup.
Post-Backup
Hook-->Hook to run after completing the
backup.
Pre-Restore
Hook-->Hook to run before starting the
actual restore of the backup.
Post-Restore
Hook-->Hook to run after completing the
restore of the backup.
Backup
Server
This is where you choose which
server to back up. This can be the local PBX that the backup module is on,
or it could be another PBX as defined in the servers section of the backup
module. Please see the server section for more information on defining
other servers. Most of the time you will pick “This Server,” since that
is what we want to back up.
Storage
Location
Storage locations are servers that
have been set up to store the actual backup on. By default we include the
local server as a storage location.
Local Storage: The backup tarball
file is stored in "/var/spool/asterisk/backup/(backupjobname)/*.tgz"
on the local machine
The Available Servers
list shows servers that have been set up to store the backup as defined in
the servers section of the backup module. Please see server section
for more information on defining other servers.

The Storage Servers list defines
where to store the backups. Drag one or more storage servers from the Available
Servers bin to the Storage Servers bin.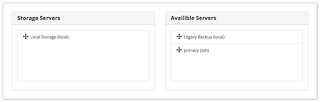

Backup
Schedule

Never
Never run the backup
Hourly
Every hour at the top of the hour
Daily
Every day at midnight
Weekly
Every Sunday at midnight
Monthly
This first of each month at midnight
Annually
January 1st at midnight
Reboot
On a reboot command of the PBX an
upgrade will be run.
Custom
Allows you to define your own
schedule on when to run upgrades.

\
Maintenance
Here we can define how many copies
of the backup we want to keep and when they should be deleted

Delete
After Time Frame
Here you can define increments, for
example delete after 3 months or 5 weeks.
Delete
After Runs
Here you can define how many copies
of the backup to delete versus deleting backups by time frame such as only
keep fifteen. On the 16th backup the oldest backup will be deleted from
the system. We recommend keeping 7-10 backups only to conserve hard drive
space
Save
When you have things the way you
want them, click the Save button.

Run
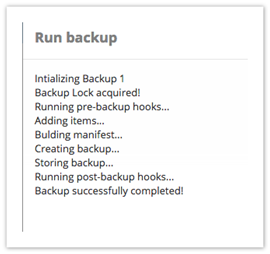
You can manually run your backup at any time by visiting the Backups section and clicking the run button ( ).
).
). When you do this, a window will pop-up displaying the status of the backup. You should see "Backup successfully completed!"
Restore
In the Restore section, you can
select a server to restore the backup from, or select a backup file on your
local computer.
Restoring
from a Server
Available servers are shown at the
bottom of the list on the right side of the screen. Select a server.
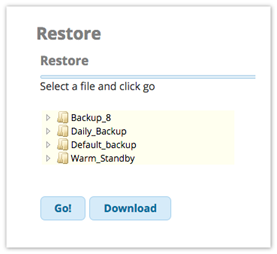
Available backups will be displayed.
Browse the folders to view available files.
Browse the folders and select a backup to restore from. More details will be shown to the right.

Click the Go! button.
You will be taken to a page where you can select which items to restore.
Use the checkboxes to select which
items you would like to restore, then click the Restore button.

A window will pop up showing the status of the restore.

The status window will say Done!
when the restore is complete.
Restoring
from a Local File
You can upload a backup file from
your local computer if you have it stored on the same computer you are using to
log into the Backup & Restore module.
In the Restore section of the
Backup & Restore module, click the Browse button.
Select a file from your local
computer.
Click the Restore button
to begin the restore process. You will be taken to a page where you can
select which items to restore.
Use the checkboxes to select which
items you would like to restore, then click the Restore button.

A window will pop up showing the
status of the restore.

The status window will say Done!
when the restore is complete.
Servers
The Servers section shows the servers
that have been created and allows you to create new servers.

Backup
Server Types
Email
Sends a backup file as an email
attachment.
FTP
Sends a backup file to an FTP server.
The backup can be directly restored from the FTP server.
Local
This is the local PBX (server) that the
backup is stored on. The backup job will be performed on this local server and
can be restored from here as well.
MySQL
Server
This is where we define where the MySQL
server is located and how to log into it so we can back up the database.
SSH
Server
This could be another PBX that you log
into and perform the backup on. For example, if you have a warm spare
backup box, you would set up the backup job on the warm spare to log into the
production server, perform the backup on the production server, and
then move the backup file to the backup server and restore it on a nightly
basis.
APPLICATION NOTE
You can also define a SSH server for
storing backups just like an FTP server, and using SCP to copy the files over
to the SSH server. Any Linux box that supports SCP can be an SSH Server.
Templates
The Templates section shows the
templates that have been created and allows you to create or edit templates.

Templates that were included at install
cannot be modified. You can create your own templates, but there typically
is no need for this unless you need to want to simplify the process of
including custom files, directories, or databases in a backup. You can create a
template for the custom files, then drag that template into a backup job
instead of adding the custom files to the backup one-by-one.
Creating
a Template
In the Templates section of the Backup
& Restore module, click the New Template button.
When creating a template you will need
to give it a name and optionally, a description.


Click the plus sign button () to select which files,
directories or databases will be included. Select the item type and then fill
in the appropriate fields. Repeat the process for each type of item you would
like to add to the template.
The example below
shows the four types of items that can be chosen from the drop-down menu.

Click the Save button when
finished.


No comments:
Post a Comment