Apache Avro
Apache Avro is a language-neutral data serialization system, developed by Doug Cutting,the father of Hadoop. This is a brief tutorial that provides an overview of how to set up Avro and how to serialize and deserialize data using Avro.Audience
This tutorial is prepared for professionals aspiring to learn the basics of Big Data Analytics using Hadoop Framework and become a successful Hadoop developer. It will be a handy resource for enthusiasts who want to use Avro for data serialization and deserialization.
Prerequisites
Before you start proceeding with this tutorial, we assume that you are already aware of Hadoop's architecture and APIs, and you have experience in writing basic applications, preferably using Java.
Data serialization is a mechanism to translate data in computer environment (like memory buffer, data structures or object state) into binary or textual form that can be transported over network or stored in some persistent storage media.
Java and Hadoop provides serialization APIs, which are java based, but Avro is not only language independent but also it is schema-based. We shall explore more difference among them in coming chapter.
What is Avro?
Apache Avro is a language-neutral data serialization system. It was developed by Doug Cutting, the father of Hadoop. Since Hadoop writable classes lack language portability, Avro becomes quite helpful, as it deals with data formats that can be processed by multiple languages. Avro is a preferred tool to serialize data in Hadoop.
Avro has a schema-based system. A language-independent schema is associated with its read and write operations. Avro serializes the data which has a built-in schema. Avro serializes the data into a compact binary format, which can be deserialized by any application.
Avro uses JSON format to declare the data structures. Presently, it supports languages such as Java, C, C++, C#, Python, and Ruby.
Avro Schemas
Avro depends heavily on its schema. It allows every data to be written with no prior knowledge of the schema. It serializes fast and the resulting serialized data is lesser in size. Schema is stored along with the Avro data in a file for any further processing.
In RPC, the client and the server exchange schemas during the connection. This exchange helps in the communication between same named fields, missing fields, extra fields, etc.
Avro schemas are defined with JSON that simplifies its implementation in languages with JSON libraries.
Like Avro, there are other serialization mechanisms in Hadoop such as Sequence Files, Protocol Buffers, and Thrift.
Thrift & Protocol Buffers Vs. Avro
Thrift and Protocol Buffers are the most competent libraries with Avro. Avro differs from these frameworks in the following ways −
- Avro supports both dynamic and static types as per the requirement. Protocol Buffers and Thrift use Interface Definition Languages (IDLs) to specify schemas and their types. These IDLs are used to generate code for serialization and deserialization.
- Avro is built in the Hadoop ecosystem. Thrift and Protocol Buffers are not built in Hadoop ecosystem.
Unlike Thrift and Protocol Buffer, Avro's schema definition is in JSON and not in any proprietary IDL.
| Property | Avro | Thrift & Protocol Buffer |
|---|---|---|
| Dynamic schema | Yes | No |
| Built into Hadoop | Yes | No |
| Schema in JSON | Yes | No |
| No need to compile | Yes | No |
| No need to declare IDs | Yes | No |
| Bleeding edge | Yes | No |
Features of Avro
Listed below are some of the prominent features of Avro −
- Avro is a language-neutral data serialization system.
- It can be processed by many languages (currently C, C++, C#, Java, Python, and Ruby).
- Avro creates binary structured format that is both compressible and splittable. Hence it can be efficiently used as the input to Hadoop MapReduce jobs.
- Avro provides rich data structures. For example, you can create a record that contains an array, an enumerated type, and a sub record. These datatypes can be created in any language, can be processed in Hadoop, and the results can be fed to a third language.
- Avro schemas defined in JSON, facilitate implementation in the languages that already have JSON libraries.
- Avro creates a self-describing file named Avro Data File, in which it stores data along with its schema in the metadata section.
- Avro is also used in Remote Procedure Calls (RPCs). During RPC, client and server exchange schemas in the connection handshake.
How to use Avro?
To use Avro, you need to follow the given workflow −
- Step 1 − Create schemas. Here you need to design Avro schema according to your data.
- Step 2 − Read the schemas into your program. It is done in two ways −
- By Generating a Class Corresponding to Schema − Compile the schema using Avro. This generates a class file corresponding to the schema
- By Using Parsers Library − You can directly read the schema using parsers library.
- Step 3 − Serialize the data using the serialization API provided for Avro, which is found in the package org.apache.avro.specific.
- Step 4 − Deserialize the data using deserialization API provided for Avro, which is found in the package org.apache.avro.specific.
- What is Serialization?
- Serialization is the process of translating data structures or objects state into binary or textual form to transport the data over network or to store on some persisten storage. Once the data is transported over network or retrieved from the persistent storage, it needs to be deserialized again. Serialization is termed as marshalling and deserialization is termed as unmarshalling.
Serialization in Java
Java provides a mechanism, called object serialization where an object can be represented as a sequence of bytes that includes the object's data as well as information about the object's type and the types of data stored in the object.After a serialized object is written into a file, it can be read from the file and deserialized. That is, the type information and bytes that represent the object and its data can be used to recreate the object in memory.ObjectInputStream and ObjectOutputStream classes are used to serialize and deserialize an object respectively in Java.Serialization in Hadoop
Generally in distributed systems like Hadoop, the concept of serialization is used forInterprocess Communication and Persistent Storage.Interprocess Communication
- To establish the interprocess communication between the nodes connected in a network, RPC technique was used.
- RPC used internal serialization to convert the message into binary format before sending it to the remote node via network. At the other end the remote system deserializes the binary stream into the original message.
- The RPC serialization format is required to be as follows −
- Compact − To make the best use of network bandwidth, which is the most scarce resource in a data center.
- Fast − Since the communication between the nodes is crucial in distributed systems, the serialization and deserialization process should be quick, producing less overhead.
- Extensible − Protocols change over time to meet new requirements, so it should be straightforward to evolve the protocol in a controlled manner for clients and servers.
- Interoperable − The message format should support the nodes that are written in different languages.
Persistent Storage
Persistent Storage is a digital storage facility that does not lose its data with the loss of power supply. For example - Magnetic disks and Hard Disk Drives.Writable Interface
This is the interface in Hadoop which provides methods for serialization and deserialization. The following table describes the methods −S.No. Methods and Description 1 void readFields(DataInput in)This method is used to deserialize the fields of the given object.2 void write(DataOutput out)This method is used to serialize the fields of the given object.WritableComparable Interface
It is the combination of Writable and Comparable interfaces. This interface inheritsWritable interface of Hadoop as well as Comparable interface of Java. Therefore it provides methods for data serialization, deserialization, and comparison.S.No. Methods and Description 1 int compareTo(class obj)This method compares current object with the given object obj.In addition to these classes, Hadoop supports a number of wrapper classes that implement WritableComparable interface. Each class wraps a Java primitive type. The class hierarchy of Hadoop serialization is given below − These classes are useful to serialize various types of data in Hadoop. For instance, let us consider the IntWritable class. Let us see how this class is used to serialize and deserialize the data in Hadoop.
IntWritable Class
This class implements Writable, Comparable, and WritableComparable interfaces. It wraps an integer data type in it. This class provides methods used to serialize and deserialize integer type of data.Constructors
S.No. Summary 1 IntWritable() 2 IntWritable( int value) Methods
S.No. Summary 1 int get()Using this method you can get the integer value present in the current object.2 void readFields(DataInput in)This method is used to deserialize the data in the given DataInput object.3 void set(int value)This method is used to set the value of the current IntWritable object.4 void write(DataOutput out)This method is used to serialize the data in the current object to the givenDataOutput object.Serializing the Data in Hadoop
The procedure to serialize the integer type of data is discussed below.- Instantiate IntWritable class by wrapping an integer value in it.
- Instantiate ByteArrayOutputStream class.
- Instantiate DataOutputStream class and pass the object ofByteArrayOutputStream class to it.
- Serialize the integer value in IntWritable object using write() method. This method needs an object of DataOutputStream class.
- The serialized data will be stored in the byte array object which is passed as parameter to the DataOutputStream class at the time of instantiation. Convert the data in the object to byte array.
Example
The following example shows how to serialize data of integer type in Hadoop −import java.io.ByteArrayOutputStream; import java.io.DataOutputStream; import java.io.IOException; import org.apache.hadoop.io.IntWritable; public class Serialization { public byte[] serialize() throws IOException{ //Instantiating the IntWritable object IntWritable intwritable = new IntWritable(12); //Instantiating ByteArrayOutputStream object ByteArrayOutputStream byteoutputStream = new ByteArrayOutputStream(); //Instantiating DataOutputStream object DataOutputStream dataOutputStream = new DataOutputStream(byteoutputStream); //Serializing the data intwritable.write(dataOutputStream); //storing the serialized object in bytearray byte[] byteArray = byteoutputStream.toByteArray(); //Closing the OutputStream dataOutputStream.close(); return(byteArray); } public static void main(String args[]) throws IOException{ Serialization serialization= new Serialization(); serialization.serialize(); System.out.println(); } }
Deserializing the Data in Hadoop
The procedure to deserialize the integer type of data is discussed below −- Instantiate IntWritable class by wrapping an integer value in it.
- Instantiate ByteArrayOutputStream class.
- Instantiate DataOutputStream class and pass the object ofByteArrayOutputStream class to it.
- Deserialize the data in the object of DataInputStream using readFields() method of IntWritable class.
- The deserialized data will be stored in the object of IntWritable class. You can retrieve this data using get() method of this class.
Example
The following example shows how to deserialize the data of integer type in Hadoop −import java.io.ByteArrayInputStream; import java.io.DataInputStream; import org.apache.hadoop.io.IntWritable; public class Deserialization { public void deserialize(byte[]byteArray) throws Exception{ //Instantiating the IntWritable class IntWritable intwritable =new IntWritable(); //Instantiating ByteArrayInputStream object ByteArrayInputStream InputStream = new ByteArrayInputStream(byteArray); //Instantiating DataInputStream object DataInputStream datainputstream=new DataInputStream(InputStream); //deserializing the data in DataInputStream intwritable.readFields(datainputstream); //printing the serialized data System.out.println((intwritable).get()); } public static void main(String args[]) throws Exception { Deserialization dese = new Deserialization(); dese.deserialize(new Serialization().serialize()); } }
Advantage of Hadoop over Java Serialization
Hadoop’s Writable-based serialization is capable of reducing the object-creation overhead by reusing the Writable objects, which is not possible with the Java’s native serialization framework.Disadvantages of Hadoop Serialization
To serialize Hadoop data, there are two ways −- You can use the Writable classes, provided by Hadoop’s native library.
- You can also use Sequence Files which store the data in binary format.
The main drawback of these two mechanisms is that Writables and SequenceFiles have only a Java API and they cannot be written or read in any other language.Therefore any of the files created in Hadoop with above two mechanisms cannot be read by any other third language, which makes Hadoop as a limited box. To address this drawback, Doug Cutting created Avro, which is a language independent data structure. - Apache software foundation provides Avro with various releases. You can download the required release from Apache mirrors. Let us see, how to set up the environment to work with Avro −
Downloading Avro
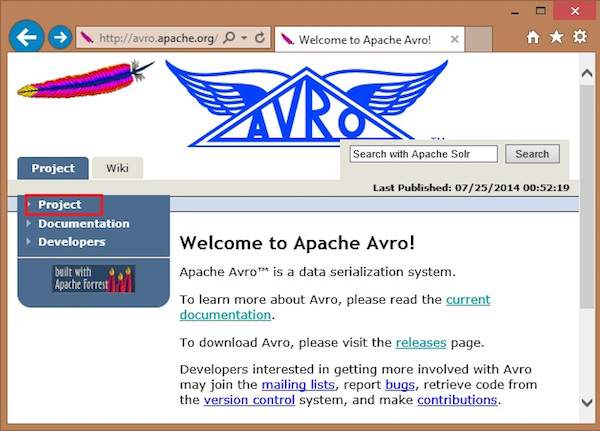
To download Apache Avro, proceed with the following −- Open the web page Apache.org. You will see the homepage of Apache Avro as shown below −
- Click on project → releases. You will get a list of releases.
- Select the latest release which leads you to a download link.
- mirror.nexcess is one of the links where you can find the list of all libraries of different languages that Avro supports as shown below −
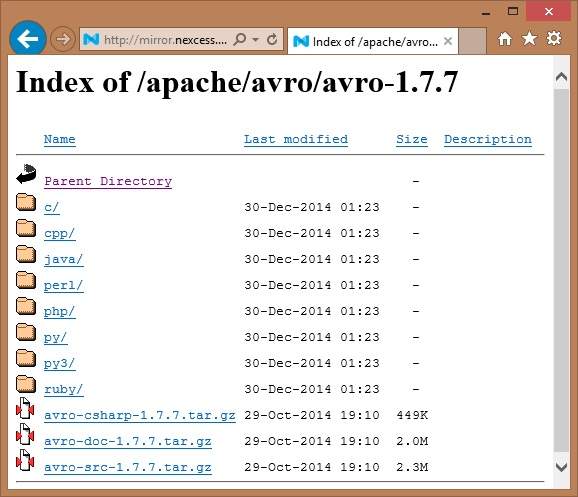 You can select and download the library for any of the languages provided. In this tutorial, we use Java. Hence download the jar files avro-1.7.7.jar and avro-tools-1.7.7.jar.
Avro with Eclipse
To use Avro in Eclipse environment, you need to follow the steps given below −- Step 1. Open eclipse.
- Step 2. Create a project.
- Step 3. Right-click on the project name. You will get a shortcut menu.
- Step 4. Click on Build Path. It leads you to another shortcut menu.
- Step 5. Click on Configure Build Path... You can see Properties window of your project as shown below −
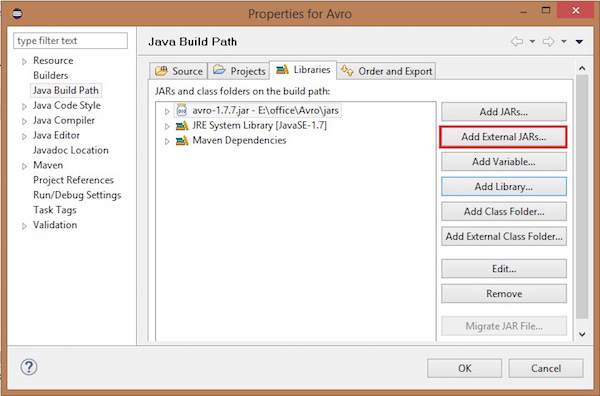
- Step 6. Under libraries tab, click on ADD EXternal JARs... button.
- Step 7. Select the jar file avro-1.77.jar you have downloaded.
- Step 8. Click on OK.
Avro with Maven
You can also get the Avro library into your project using Maven. Given below is the pom.xml file for Avro.<project xmlns="http://maven.apache.org/POM/4.0.0" xmlns:xsi=" http://www.w3.org/2001/XMLSchema-instance" xsi:schemaLocation="http://maven.apache.org/POM/4.0.0 http://maven.apache.org/xsd/maven-4.0.0.xsd"> <modelVersion>4.0.0</modelVersion> <groupId>Test</groupId> <artifactId>Test</artifactId> <version>0.0.1-SNAPSHOT</version> <build> <sourceDirectory>src</sourceDirectory> <plugins> <plugin> <artifactId>maven-compiler-plugin</artifactId> <version>3.1</version> <configuration> <source>1.7</source> <target>1.7</target> </configuration> </plugin> </plugins> </build> <dependencies> <dependency> <groupId>org.apache.avro</groupId> <artifactId>avro</artifactId> <version>1.7.7</version> </dependency> <dependency> <groupId>org.apache.avro</groupId> <artifactId>avro-tools</artifactId> <version>1.7.7</version> </dependency> <dependency> <groupId>org.apache.logging.log4j</groupId> <artifactId>log4j-api</artifactId> <version>2.0-beta9</version> </dependency> <dependency> <groupId>org.apache.logging.log4j</groupId> <artifactId>log4j-core</artifactId> <version>2.0-beta9</version> </dependency> </dependencies> </project>
Setting Classpath
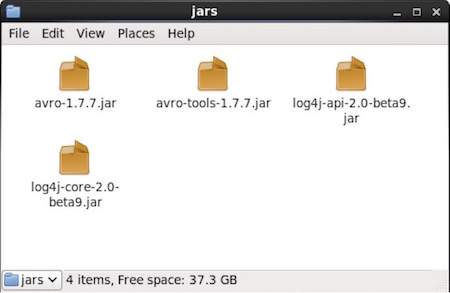
To work with Avro in Linux environment, download the following jar files −- avro-1.77.jar
- avro-tools-1.77.jar
- log4j-api-2.0-beta9.jar
- og4j-core-2.0.beta9.jar.
Copy these files into a folder and set the classpath to the folder, in the ./bashrc file as shown below.#class path for Avro export CLASSPATH=$CLASSPATH://home/Hadoop/Avro_Work/jars/*
- Avro, being a schema-based serialization utility, accepts schemas as input. In spite of various schemas being available, Avro follows its own standards of defining schemas. These schemas describe the following details −
- type of file (record by default)
- location of record
- name of the record
- fields in the record with their corresponding data types
Using these schemas, you can store serialized values in binary format using less space. These values are stored without any metadata.Creating Avro Schemas
The Avro schema is created in JavaScript Object Notation (JSON) document format, which is a lightweight text-based data interchange format. It is created in one of the following ways −- A JSON string
- A JSON object
- A JSON array
Example − The given schema defines a (record type) document within "Tutorialspoint" namespace. The name of document is "Employee" which contains two "Fields" → Name and Age.{ "type" : "record", "namespace" : "Tutorialspoint", "name" : "Employee", "fields" : [ { "name" : "Name" , "type" : "string" }, { "name" : "Age" , "type" : "int" } ] }We observed that schema contains four attributes, they are briefly described below −- type − Describes document type, in this case a "record".
- namespace − Describes the name of the namespace in which the object resides.
- name − Describes the schema name.
- fields − This is an attribute array which contains the following −
- name − Describes the name of field
- type − Describes data type of field
Primitive Data Types of Avro
Avro schema is having primitive data types as well as complex data types. The following table describes the primitive data types of Avro −Data type Description null Null is a type having no value. int 32-bit signed integer. long 64-bit signed integer. float single precision (32-bit) IEEE 754 floating-point number. double double precision (64-bit) IEEE 754 floating-point number. bytes sequence of 8-bit unsigned bytes. string Unicode character sequence. Complex Data Types of Avro
Along with primitive data types, Avro provides six complex data types namely Records, Enums, Arrays, Maps, Unions, and Fixed.Record
As we know already by now, a record data type in Avro is a collection of multiple attributes. It supports the following attributes −- name
- namespace
- type
- fields
Enum
An enumeration is a list of items in a collection, Avro enumeration supports the following attributes −- name − The value of this field holds the name of the enumeration.
- namespace − The value of this field contains the string that qualifies the name of the Enumeration.
- symbols − The value of this field holds the enum's symbols as an array of names.
ExampleGiven below is the example of an enumeration.{ "type" : "enum", "name" : "Numbers", "namespace": "data", "symbols" : [ "ONE", "TWO", "THREE", "FOUR" ] }Arrays
This data type defines an array field having a single attribute items. This items attribute specifies the type of items in the array.Example{ " type " : " array ", " items " : " int " }Maps
The map data type is an array of key-value pairs. The values attribute holds the data type of the content of map. Avro map values are implicitly taken as strings. The below example shows map from string to int.Example{"type" : "map", "values" : "int"}Unions
A union datatype is used whenever the field has one or more datatypes. They are represented as JSON arrays. For example, if a field that could be either an int or null, then the union is represented as ["int", "null"].ExampleGiven below is an example document using unions −{ "type" : "record", "namespace" : "tutorialspoint", "name" : "empdetails ", "fields" : [ { "name" : "experience", "type": ["int", "null"] }, { "name" : "age", "type": "int" } ] }Fixed
This data type is used to declare a fixed-sized field that can be used for storing binary data. It has field name and data as attributes. Name holds the name of the field, and size holds the size of the field.Example{ "type" : "fixed" , "name" : "bdata", "size" : 1048576} - In the previous chapter, we described the input type of Avro, i.e., Avro schemas. In this chapter, we will explain the classes and methods used in the serialization and deserialization of Avro schemas.
SpecificDatumWriter Class
This class belongs to the package org.apache.avro.specific. It implements theDatumWriter interface which converts Java objects into an in-memory serialized format.Constructor
S.No. Description 1 SpecificDatumWriter(Schema schema) Method
S.No. Description 1 SpecificData getSpecificData()Returns the SpecificData implementation used by this writer.SpecificDatumReader Class
This class belongs to the package org.apache.avro.specific. It implements theDatumReader interface which reads the data of a schema and determines in-memory data representation. SpecificDatumReader is the class which supports generated java classes.Constructor
S.No. Description 1 SpecificDatumReader(Schema schema)Construct where the writer's and reader's schemas are the same.Methods
S.No. Description 1 SpecificData getSpecificData()Returns the contained SpecificData.2 void setSchema(Schema actual)This method is used to set the writer's schema.DataFileWriter
Instantiates DataFileWrite for emp class. This class writes a sequence serialized records of data conforming to a schema, along with the schema in a file.Constructor
S.No. Description 1 DataFileWriter(DatumWriter<D> dout) Methods
S.No Description 1 void append(D datum)Appends a datum to a file.2 DataFileWriter<D> appendTo(File file)This method is used to open a writer appending to an existing file.Data FileReader
This class provides random access to files written with DataFileWriter. It inherits the classDataFileStream.Constructor
S.No. Description 1 DataFileReader(File file, DatumReader<D> reader)) Methods
S.No. Description 1 next()Reads the next datum in the file.2 Boolean hasNext()Returns true if more entries remain in this file.Class Schema.parser
This class is a parser for JSON-format schemas. It contains methods to parse the schema. It belongs to org.apache.avro package.Constructor
S.No. Description 1 Schema.Parser() Methods
S.No. Description 1 parse (File file)Parses the schema provided in the given file.2 parse (InputStream in)Parses the schema provided in the given InputStream.3 parse (String s)Parses the schema provided in the given String.Interface GenricRecord
This interface provides methods to access the fields by name as well as index.Methods
S.No. Description 1 Object get(String key)Returns the value of a field given.2 void put(String key, Object v)Sets the value of a field given its name.Class GenericData.Record
Constructor
S.No. Description 1 GenericData.Record(Schema schema) Methods
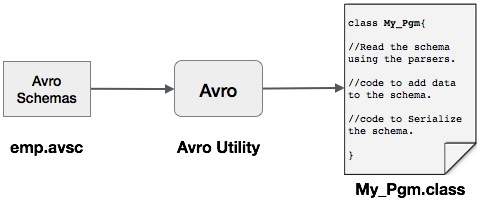
S.No. Description 1 Object get(String key)Returns the value of a field of the given name.2 Schema getSchema()Returns the schema of this instance.3 void put(int i, Object v)Sets the value of a field given its position in the schema.4 void put(String key, Object value)Sets the value of a field given its name.One can read an Avro schema into the program either by generating a class corresponding to a schema or by using the parsers library. This chapter describes how to read the schemaby generating a class and serialize the data using Avro.The following is a depiction of serializing the data with Avro by generating a class. Here,emp.avsc is the schema file which we pass as input to Avro utility.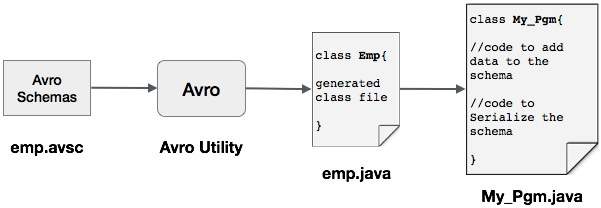 The output of Avro is a java file.
Serialization by Generating a Class
To serialize the data using Avro, follow the steps as given below −- Define an Avro schema.
- Compile the schema using Avro utility. You get the Java code corresponding to that schema.
- Populate the schema with the data.
- Serialize it using Avro library.
Defining a Schema
Suppose you want a schema with the following details −Field Name id age salary address type String int int int string Create an Avro schema as shown below and save it as emp.avsc.{ "namespace": "tutorialspoint.com", "type": "record", "name": "emp", "fields": [ {"name": "name", "type": "string"}, {"name": "id", "type": "int"}, {"name": "salary", "type": "int"}, {"name": "age", "type": "int"}, {"name": "address", "type": "string"} ] }Compiling the Schema
After creating the Avro schema, we need to compile it using Avro tools. Arvo tools can be located in avro-tools-1.7.7.jar file. We need to provide arvo-tools-1.7.7.jar file path at compilation.Syntax to Compile an Avro Schema
java -jar <path/to/avro-tools-1.7.7.jar> compile schema <path/to/schema-file> <destination-folder>
Open the terminal in the home folder. Create a new directory to work with Avro as shown below −$ mkdir Avro_Work
In the newly created directory, create three sub-directories −- First named schema, to place the schema.
- Second named with_code_gen, to place the generated code.
- Third named jars, to place the jar files.
$ mkdir schema
$ mkdir with_code_gen
$ mkdir jars
The following screenshot shows how your Avro_work folder should look like after creating all the directories.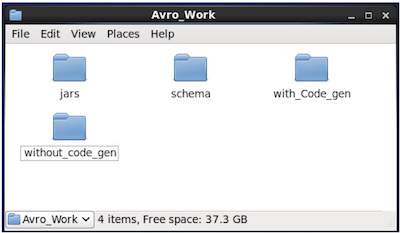
- Now /home/Hadoop/Avro_work/jars/avro-tools-1.7.7.jar is the path for the directory where you have downloaded avro-tools-1.7.7.jar file.
- /home/Hadoop/Avro_work/schema/ is the path for the directory where your schema file emp.avsc is stored.
- /home/Hadoop/Avro_work/with_code_gen is the directory where you want the generated class files to be stored.
Compile the schema as shown below −$ java -jar /home/Hadoop/Avro_work/jars/avro-tools-1.7.7.jar compile schema /home/Hadoop/Avro_work/schema/emp.avsc /home/Hadoop/Avro/with_code_gen
After this compilation, a package is created in the destination directory with the name mentioned as namespace in the schema file. Within this package, the Java source file with schema name is generated. The generated file contains java code corresponding to the schema. This java file can be directly accessed by an application.In our example, a package/folder, named tutorialspoint is created which contains another folder named com (since the name space is tutorialspoint.com) and within it, resides the generated file emp.java. The following snapshot shows emp.java −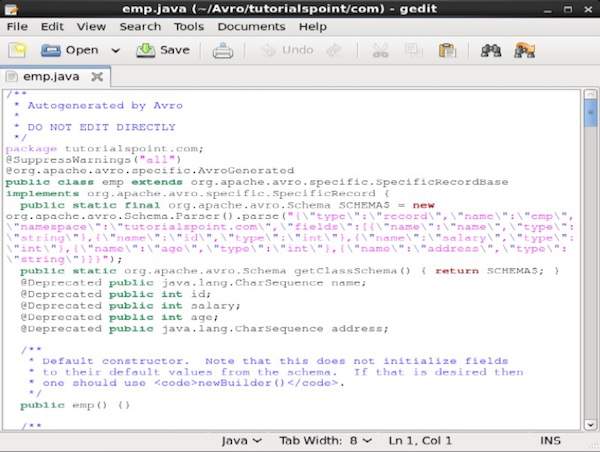 This java file is useful to create data according to schema.The generated class contains −
- Default constructor, and parameterized constructor which accept all the variables of the schema.
- The setter and getter methods for all variables in the schema.
- Get() method which returns the schema.
- Builder methods.
Creating and Serializing the Data
First of all, copy the generated java file used in this project into the current directory or import it from where it is located.Now we can write a new Java file and instantiate the class in the generated file (emp) to add employee data to the schema.Let us see the procedure to create data according to the schema using apache Avro.Step 1
Instantiate the generated emp class.emp e1=new emp( );
Step 2
Using setter methods, insert the data of first employee. For example, we have created the details of the employee named Omar.e1.setName("omar"); e1.setAge(21); e1.setSalary(30000); e1.setAddress("Hyderabad"); e1.setId(001);Similarly, fill in all employee details using setter methods.Step 3
Create an object of DatumWriter interface using the SpecificDatumWriter class. This converts Java objects into in-memory serialized format. The following example instantiatesSpecificDatumWriter class object for emp class.DatumWriter<emp> empDatumWriter = new SpecificDatumWriter<emp>(emp.class);
Step 4
Instantiate DataFileWriter for emp class. This class writes a sequence serialized records of data conforming to a schema, along with the schema itself, in a file. This class requires theDatumWriter object, as a parameter to the constructor.DataFileWriter<emp> empFileWriter = new DataFileWriter<emp>(empDatumWriter);
Step 5
Open a new file to store the data matching to the given schema using create() method. This method requires the schema, and the path of the file where the data is to be stored, as parameters.In the following example, schema is passed using getSchema() method, and the data file is stored in the path − /home/Hadoop/Avro/serialized_file/emp.avro.empFileWriter.create(e1.getSchema(),new File("/home/Hadoop/Avro/serialized_file/emp.avro"));
Step 6
Add all the created records to the file using append() method as shown below −empFileWriter.append(e1); empFileWriter.append(e2); empFileWriter.append(e3);
Example – Serialization by Generating a Class
The following complete program shows how to serialize data into a file using Apache Avro −import java.io.File; import java.io.IOException; import org.apache.avro.file.DataFileWriter; import org.apache.avro.io.DatumWriter; import org.apache.avro.specific.SpecificDatumWriter; public class Serialize { public static void main(String args[]) throws IOException{ //Instantiating generated emp class emp e1=new emp(); //Creating values according the schema e1.setName("omar"); e1.setAge(21); e1.setSalary(30000); e1.setAddress("Hyderabad"); e1.setId(001); emp e2=new emp(); e2.setName("ram"); e2.setAge(30); e2.setSalary(40000); e2.setAddress("Hyderabad"); e2.setId(002); emp e3=new emp(); e3.setName("robbin"); e3.setAge(25); e3.setSalary(35000); e3.setAddress("Hyderabad"); e3.setId(003); //Instantiate DatumWriter class DatumWriter<emp> empDatumWriter = new SpecificDatumWriter<emp>(emp.class); DataFileWriter<emp> empFileWriter = new DataFileWriter<emp>(empDatumWriter); empFileWriter.create(e1.getSchema(), new File("/home/Hadoop/Avro_Work/with_code_gen/emp.avro")); empFileWriter.append(e1); empFileWriter.append(e2); empFileWriter.append(e3); empFileWriter.close(); System.out.println("data successfully serialized"); } }
Browse through the directory where the generated code is placed. In this case, athome/Hadoop/Avro_work/with_code_gen.In Terminal −$ cd home/Hadoop/Avro_work/with_code_gen/
In GUI −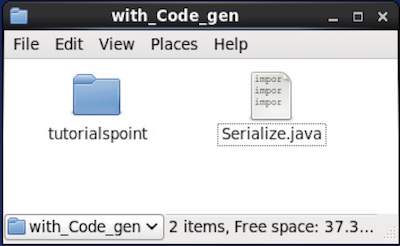 Now copy and save the above program in the file named Serialize.java and compile and execute it as shown below −
$ javac Serialize.java $ java Serialize
Output
data successfully serialized
If you verify the path given in the program, you can find the generated serialized file as shown below.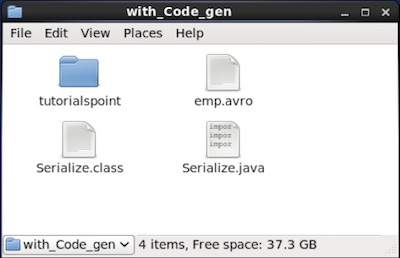
- The hasNext() method will return a boolean if there are any elements in the Reader.
- The next() method of DataFileReader returns the data in the Reader.
- the schema,
- the path of the file where the data is to be stored.
- The hasNext() method returns a boolean if there are any elements in the Reader.
- The next() method of DataFileReader returns the data in the Reader.
As described earlier, one can read an Avro schema into a program either by generating a class corresponding to the schema or by using the parsers library. This chapter describes how to read the schema by generating a class and Deserialize the data using Avro.
Deserialization by Generating a Class
In our last example, the serialized data was stored in the file emp.avro. We shall now see how to deserialize it and read it using Avro. The procedure is as follows −
Step 1
Create an object of DatumReader interface using SpecificDatumReader class.
DatumReader<emp>empDatumReader = new SpecificDatumReader<emp>(emp.class);
Step 2
Instantiate DataFileReader class. This class reads serialized data from a file. It requires theDatumReader object, and path of the file (emp.avro) where the serialized data is existing , as a parameters to the constructor.
DataFileReader<emp> dataFileReader = new DataFileReader(new File("/path/to/emp.avro"), empDatumReader);
Step 3
Print the deserialized data, using the methods of DataFileReader.
while(dataFileReader.hasNext()){ em=dataFileReader.next(em); System.out.println(em); }
Example – Deserialization by Generating a Class
The following complete program shows how to deserialize the data in a file using Avro.
import java.io.File; import java.io.IOException; import org.apache.avro.file.DataFileReader; import org.apache.avro.io.DatumReader; import org.apache.avro.specific.SpecificDatumReader; public class Deserialize { public static void main(String args[]) throws IOException{ //DeSerializing the objects DatumReader<emp> empDatumReader = new SpecificDatumReader<emp>(emp.class); //Instantiating DataFileReader DataFileReader<emp> dataFileReader = new DataFileReader<emp>(new File("/home/Hadoop/Avro_Work/with_code_genfile/emp.avro"), empDatumReader); emp em=null; while(dataFileReader.hasNext()){ em=dataFileReader.next(em); System.out.println(em); } } }
Browse into the directory where the generated code is placed. In this case, athome/Hadoop/Avro_work/with_code_gen.
$ cd home/Hadoop/Avro_work/with_code_gen/
Now, copy and save the above program in the file named DeSerialize.java. Compile and execute it as shown below −
$ javac Deserialize.java $ java Deserialize
Output
{"name": "omar", "id": 1, "salary": 30000, "age": 21, "address": "Hyderabad"}
{"name": "ram", "id": 2, "salary": 40000, "age": 30, "address": "Hyderabad"}
{"name": "robbin", "id": 3, "salary": 35000, "age": 25, "address": "Hyderabad"}
One can read an Avro schema into a program either by generating a class corresponding to a schema or by using the parsers library. In Avro, data is always stored with its corresponding schema. Therefore, we can always read a schema without code generation.
This chapter describes how to read the schema by using parsers library and to serializethe data using Avro.
The following is a depiction of serializing the data with Avro using parser libraries. Here, emp.avsc is the schema file which we pass as input to Avro utility.
Serialization Using Parsers Library
To serialize the data, we need to read the schema, create data according to the schema, and serialize the schema using the Avro API. The following procedure serializes the data without generating any code −
Step 1
First of all, read the schema from the file. To do so, use Schema.Parser class. This class provides methods to parse the schema in different formats.
Instantiate the Schema.Parser class by passing the file path where the schema is stored.
Schema schema = new Schema.Parser().parse(new File("/path/to/emp.avsc"));
Step 2
Create the object of GenericRecord interface, by instantiating GenericData.Record class. This constructor accepts a parameter of type Schema. Pass the schema object created in step 1 to its constructor as shown below −
GenericRecord e1 = new GenericData.Record(schema);
Step 3
Insert the values in the schema using the put() method of the GenericData class.
e1.put("name", "ramu");
e1.put("id", 001);
e1.put("salary",30000);
e1.put("age", 25);
e1.put("address", "chennai");
Step 4
Create an object of DatumWriter interface using the SpecificDatumWriter class. It converts Java objects into in-memory serialized format. The following example instantiatesSpecificDatumWriter class object for emp class −
DatumWriter<emp> empDatumWriter = new SpecificDatumWriter<emp>(emp.class);
Step 5
Instantiate DataFileWriter for emp class. This class writes serialized records of data conforming to a schema, along with the schema itself, in a file. This class requires theDatumWriter object, as a parameter to the constructor.
DataFileWriter<emp> dataFileWriter = new DataFileWriter<emp>(empDatumWriter);
Step 6
Open a new file to store the data matching to the given schema using create() method. This method requires two parameters −
In the example given below, schema is passed using getSchema() method and the serialized data is stored in emp.avro.
empFileWriter.create(e1.getSchema(), new File("/path/to/emp.avro"));
Step 7
Add all the created records to the file using append( ) method as shown below.
empFileWriter.append(e1);
empFileWriter.append(e2);
empFileWriter.append(e3);
Example – Serialization Using Parsers
The following complete program shows how to serialize the data using parsers −
import java.io.File; import java.io.IOException; import org.apache.avro.Schema; import org.apache.avro.file.DataFileWriter; import org.apache.avro.generic.GenericData; import org.apache.avro.generic.GenericDatumWriter; import org.apache.avro.generic.GenericRecord; import org.apache.avro.io.DatumWriter; public class Seriali { public static void main(String args[]) throws IOException{ //Instantiating the Schema.Parser class. Schema schema = new Schema.Parser().parse(new File("/home/Hadoop/Avro/schema/emp.avsc")); //Instantiating the GenericRecord class. GenericRecord e1 = new GenericData.Record(schema); //Insert data according to schema e1.put("name", "ramu"); e1.put("id", 001); e1.put("salary",30000); e1.put("age", 25); e1.put("address", "chenni"); GenericRecord e2 = new GenericData.Record(schema); e2.put("name", "rahman"); e2.put("id", 002); e2.put("salary", 35000); e2.put("age", 30); e2.put("address", "Delhi"); DatumWriter<GenericRecord> datumWriter = new GenericDatumWriter<GenericRecord>(schema); DataFileWriter<GenericRecord> dataFileWriter = new DataFileWriter<GenericRecord>(datumWriter); dataFileWriter.create(schema, new File("/home/Hadoop/Avro_work/without_code_gen/mydata.txt")); dataFileWriter.append(e1); dataFileWriter.append(e2); dataFileWriter.close(); System.out.println(“data successfully serialized”); } }
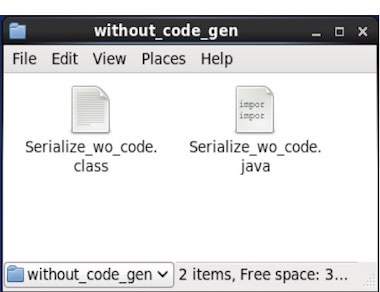
Browse into the directory where the generated code is placed. In this case, athome/Hadoop/Avro_work/without_code_gen.
$ cd home/Hadoop/Avro_work/without_code_gen/
Now copy and save the above program in the file named Serialize.java. Compile and execute it as shown below −
$ javac Serialize.java
$ java Serialize
Output
data successfully serialized
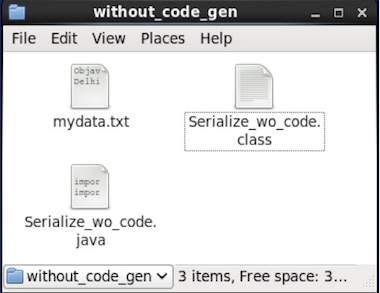
If you verify the path given in the program, you can find the generated serialized file as shown below.
As described earlier, one can read an Avro schema into a program either by generating a class corresponding to the schema or by using the parsers library. This chapter describes how to read the schema by using parser library and Deserialize the data using Avro.
Deserialization Using Parsers Library
In our last example, the serialized data was stored in the file mydata.txt. We shall now see how to deserialize it and read it using Avro. The procedure is as follows −
Step 1
First of all, read the schema from the file. To do so, use Schema.Parser class. This class provides methods to parse the schema in different formats.
Instantiate the Schema.Parser class by passing the file path where the schema is stored.
Schema schema = new Schema.Parser().parse(new File("/path/to/emp.avsc"));
Step 2
Create an object of DatumReader interface using SpecificDatumReader class.
DatumReader<emp>empDatumReader = new SpecificDatumReader<emp>(emp.class);
Step 3
Instantiate DataFileReader class. This class reads serialized data from a file. It requires theDatumReader object, and path of the file where the serialized data exists, as a parameters to the constructor.
DataFileReader<GenericRecord> dataFileReader = new DataFileReader<GenericRecord>(new File("/path/to/mydata.txt"), datumReader);
Step 4
Print the deserialized data, using the methods of DataFileReader.
while(dataFileReader.hasNext()){

   em=dataFileReader.next(em);
   System.out.println(em);
}
Example – Deserialization Using Parsers Library
The following complete program shows how to deserialize the serialized data using Parsers library −
public class Deserialize { public static void main(String args[]) throws Exception{ //Instantiating the Schema.Parser class. Schema schema = new Schema.Parser().parse(new File("/home/Hadoop/Avro/schema/emp.avsc")); DatumReader<GenericRecord> datumReader = new GenericDatumReader<GenericRecord>(schema); DataFileReader<GenericRecord> dataFileReader = new DataFileReader<GenericRecord>(new File("/home/Hadoop/Avro_Work/without_code_gen/mydata.txt"), datumReader); GenericRecord emp = null; while (dataFileReader.hasNext()) { emp = dataFileReader.next(emp); System.out.println(emp); } System.out.println("hello"); } }
Browse into the directory where the generated code is placed. In this case, it is athome/Hadoop/Avro_work/without_code_gen.
$ cd home/Hadoop/Avro_work/without_code_gen/
Now copy and save the above program in the file named DeSerialize.java. Compile and execute it as shown below −
$ javac Deserialize.java
$ java Deserialize
Output
{"name": "ramu", "id": 1, "salary": 30000, "age": 25, "address": "chennai"}
{"name": "rahman", "id": 2, "salary": 35000, "age": 30, "address": "Delhi"}


No comments:
Post a Comment